
Before you start
Create your account
Sign up from the Prova gratuita ("Free trial") page on the DIANA website with your name, email and password. No credit card is required, and at this stage you don't need to install anything.
Set up your company
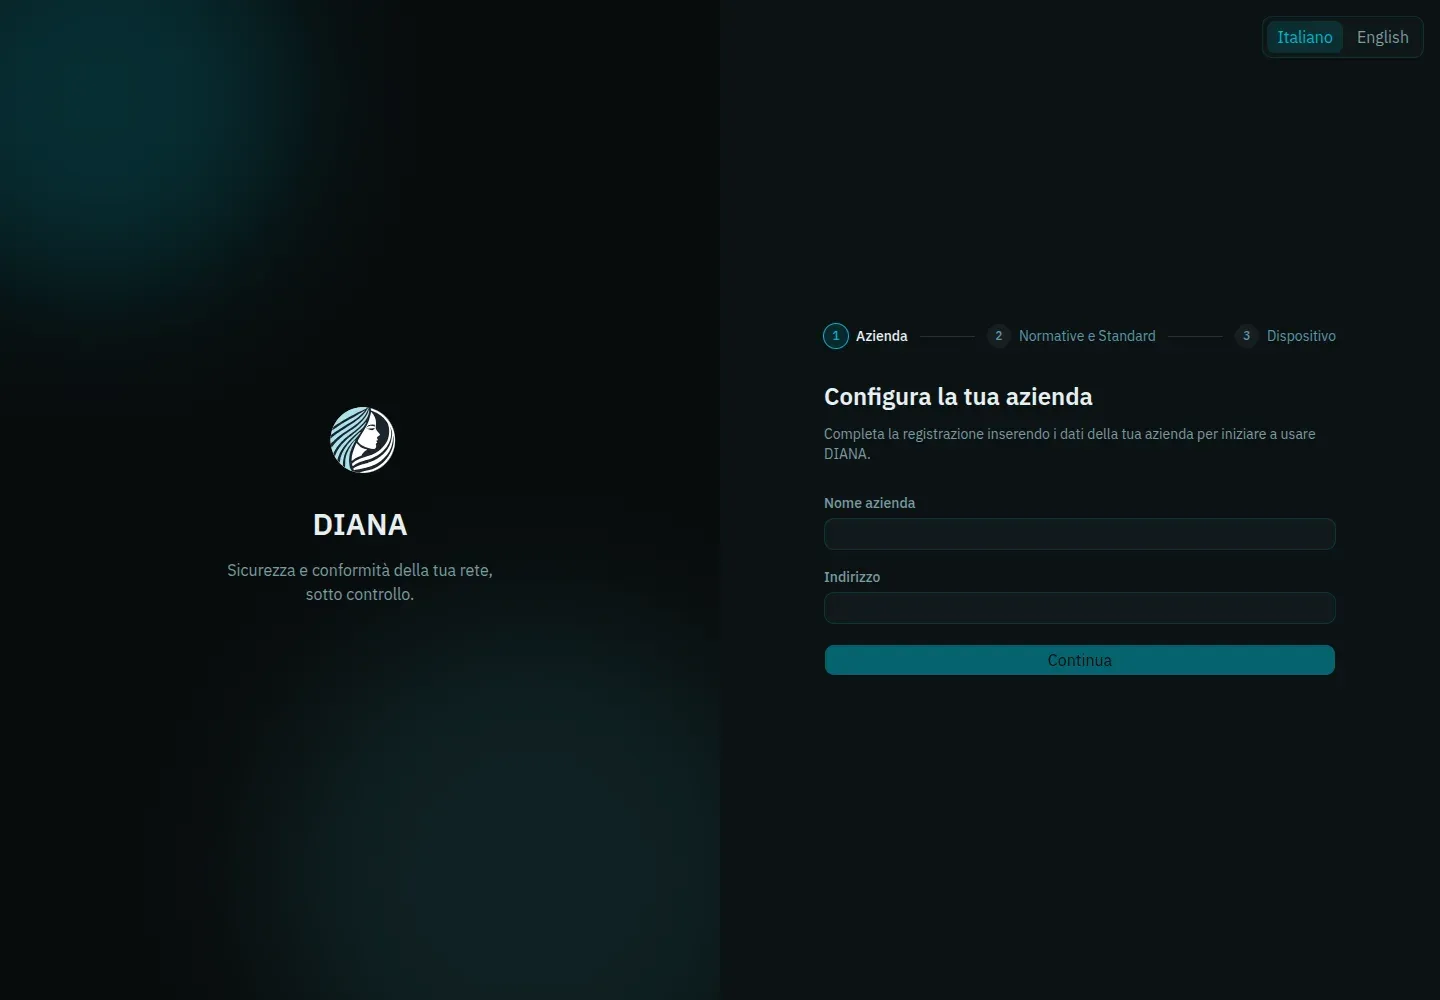
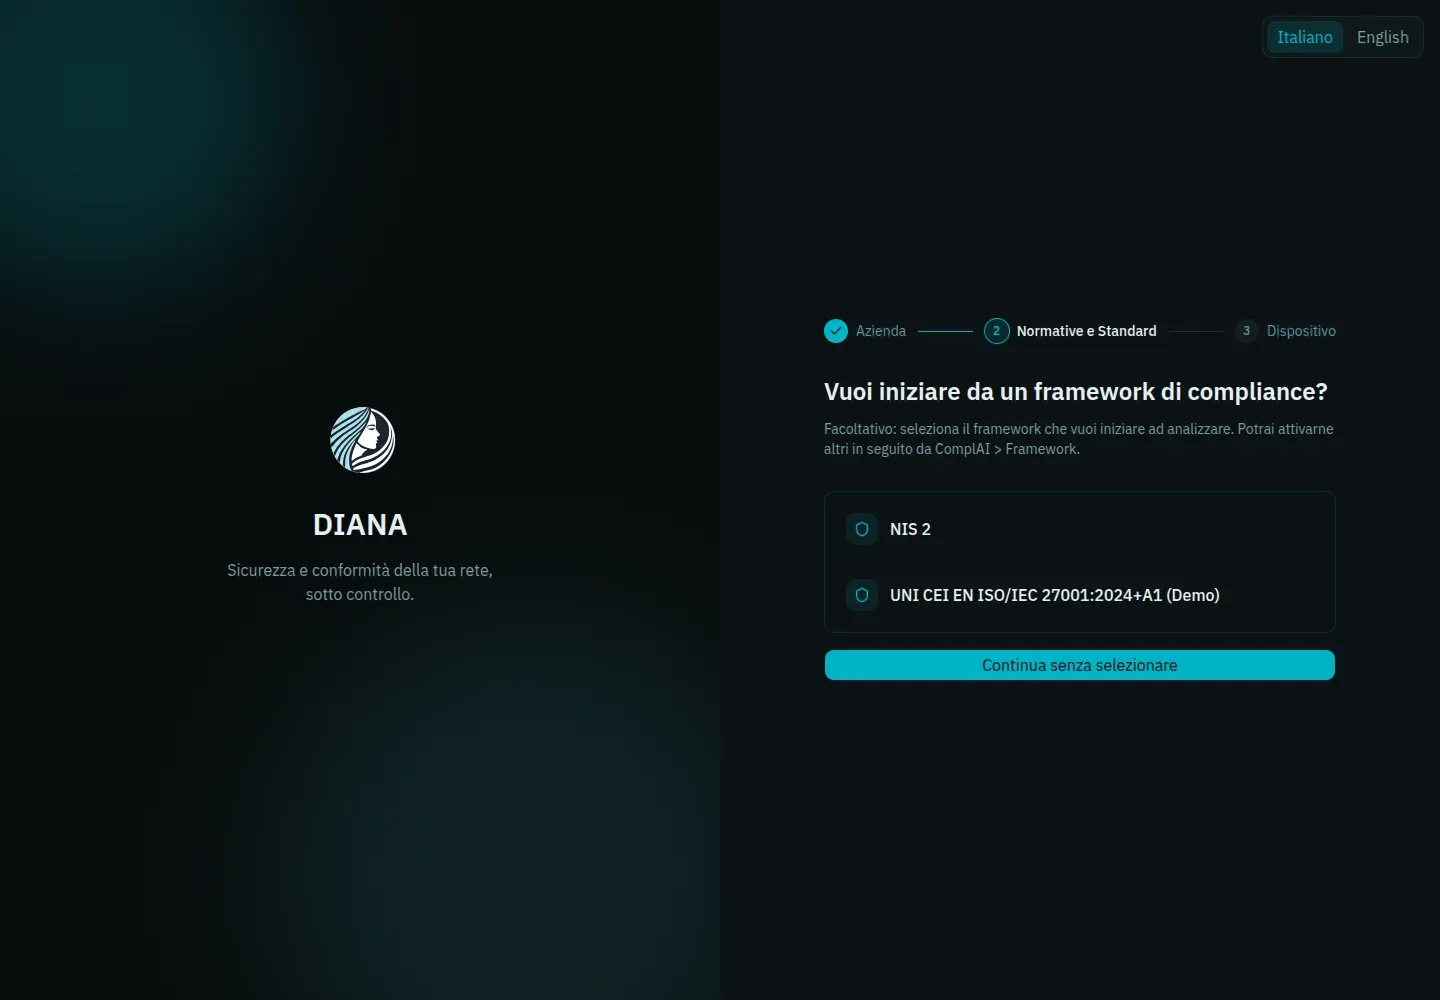
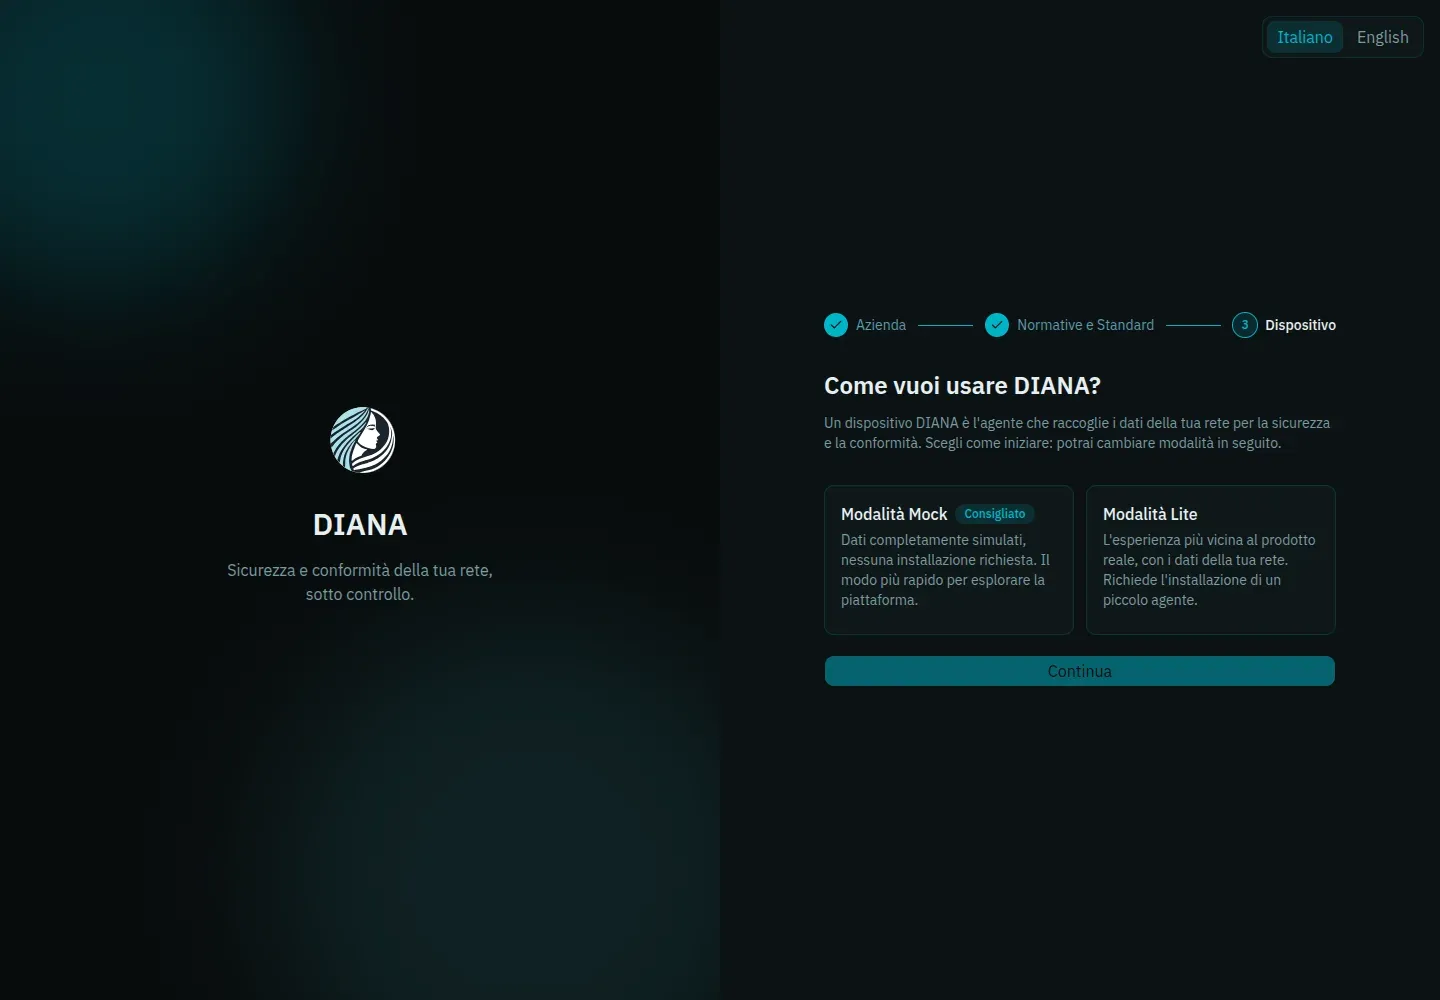
After signing up, complete the Configura la tua azienda ("Set up your company") wizard, which has three steps:
- Azienda ("Company") — name and address.
- Normative e Standard ("Regulations and Standards", optional) — choose the reference framework for ComplAI, for example ISO 27001 or NIS 2. You can also skip this for now and configure it later from ComplAI → Framework.
- Dispositivo ("Device") — choose how to collect data: in Mock or Lite mode. Both options are described in the next section.
Choose where to start
To explore devices and vulnerabilities, continue with Network analysis. To work on documentation and compliance requirements, go to ComplAI: this path runs entirely in the web application and doesn't require DIANA LITE.
Network analysis
DIANA collects and organizes information about the devices on your network, helping you browse the inventory, spot vulnerabilities and dig into the results for each device. During the trial you can use simulated data or analyze your own local network with DIANA LITE.
Choose how to use it
You can choose the mode during initial setup and change it later from the Integrazioni ("Integrations") section.
Mock mode (recommended)
Mock mode lets you explore the platform with simulated data, without installing anything. DIANA generates devices, vulnerabilities and links to show you how information is organized and presented.
Lite mode
Lite mode lets you analyze your own local network. The DIANA LITE desktop client finds connected devices and sends the collected information to the platform. You'll find instructions in the Installing and using DIANA LITE section.
Start the analysis with Lite
Select the operating system (Ubuntu, Debian or Windows). DIANA creates the device and shows a Nome utente ("Username") and Password: copy and store them somewhere safe, because they're only shown once. The program download starts automatically; you can restart it with the dedicated button if needed. Then select Continua alla dashboard ("Continue to dashboard").
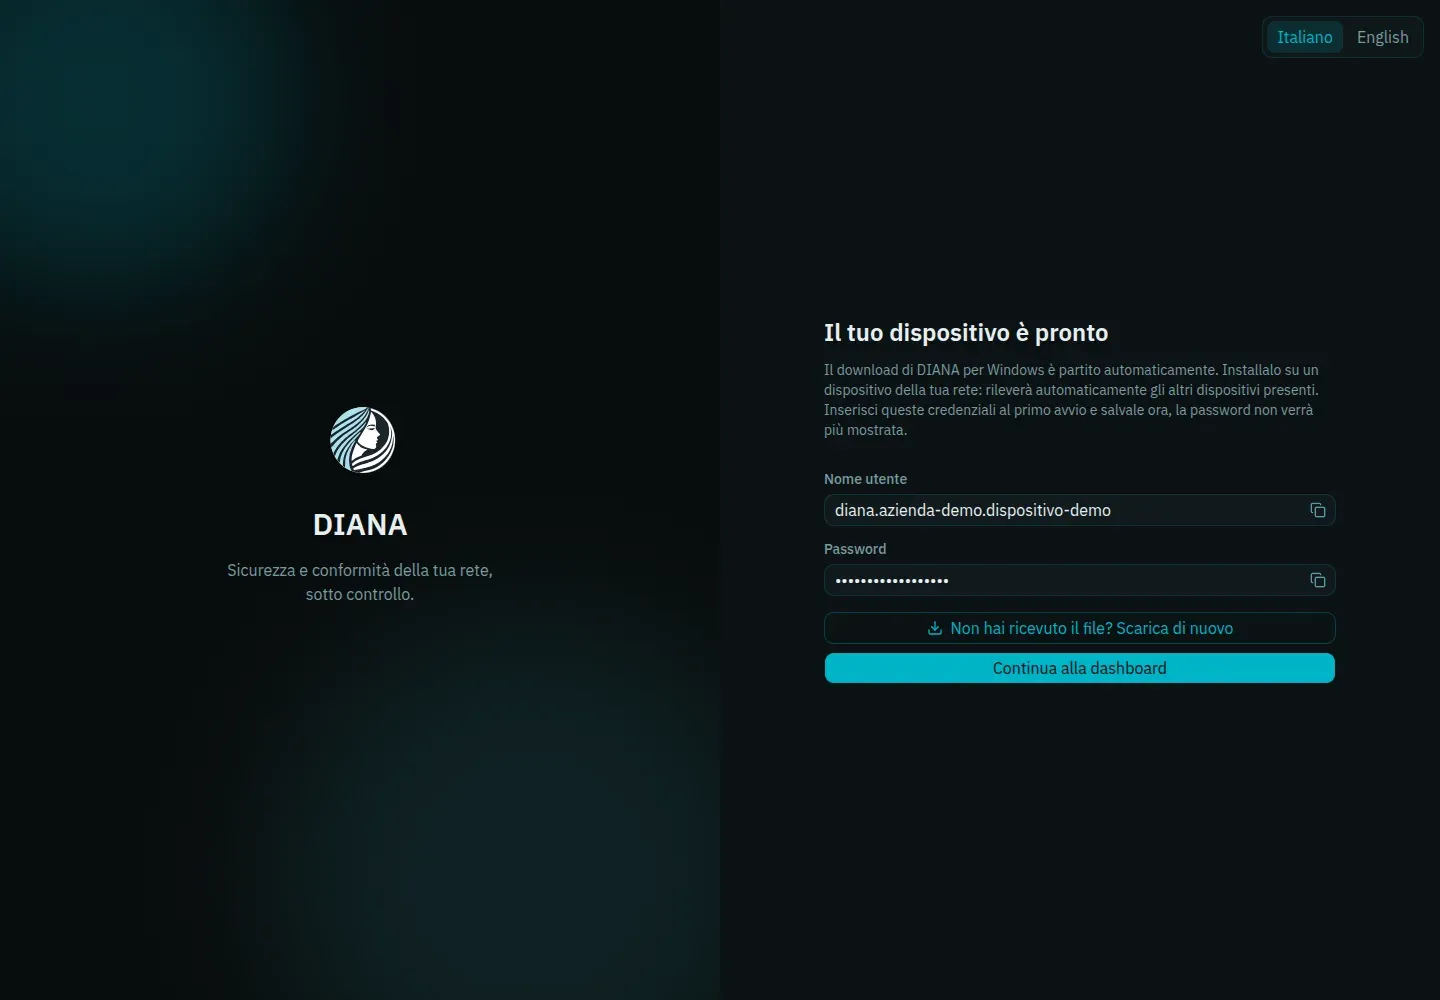
Now follow the instructions to start the client on Windows or install it on Linux. Enter the credentials in the client, complete the activation and select Avvia ("Start"). You can then go back to the web application to view the results.
Review the network analysis results
In both modes, you can view the information in the web application. With Mock you see simulated data; with Lite you find the information collected on your network. The first time you visit each page you'll see a short guided tour, which you can reopen from the Serve un ripasso? ("Need a refresher?") icon.
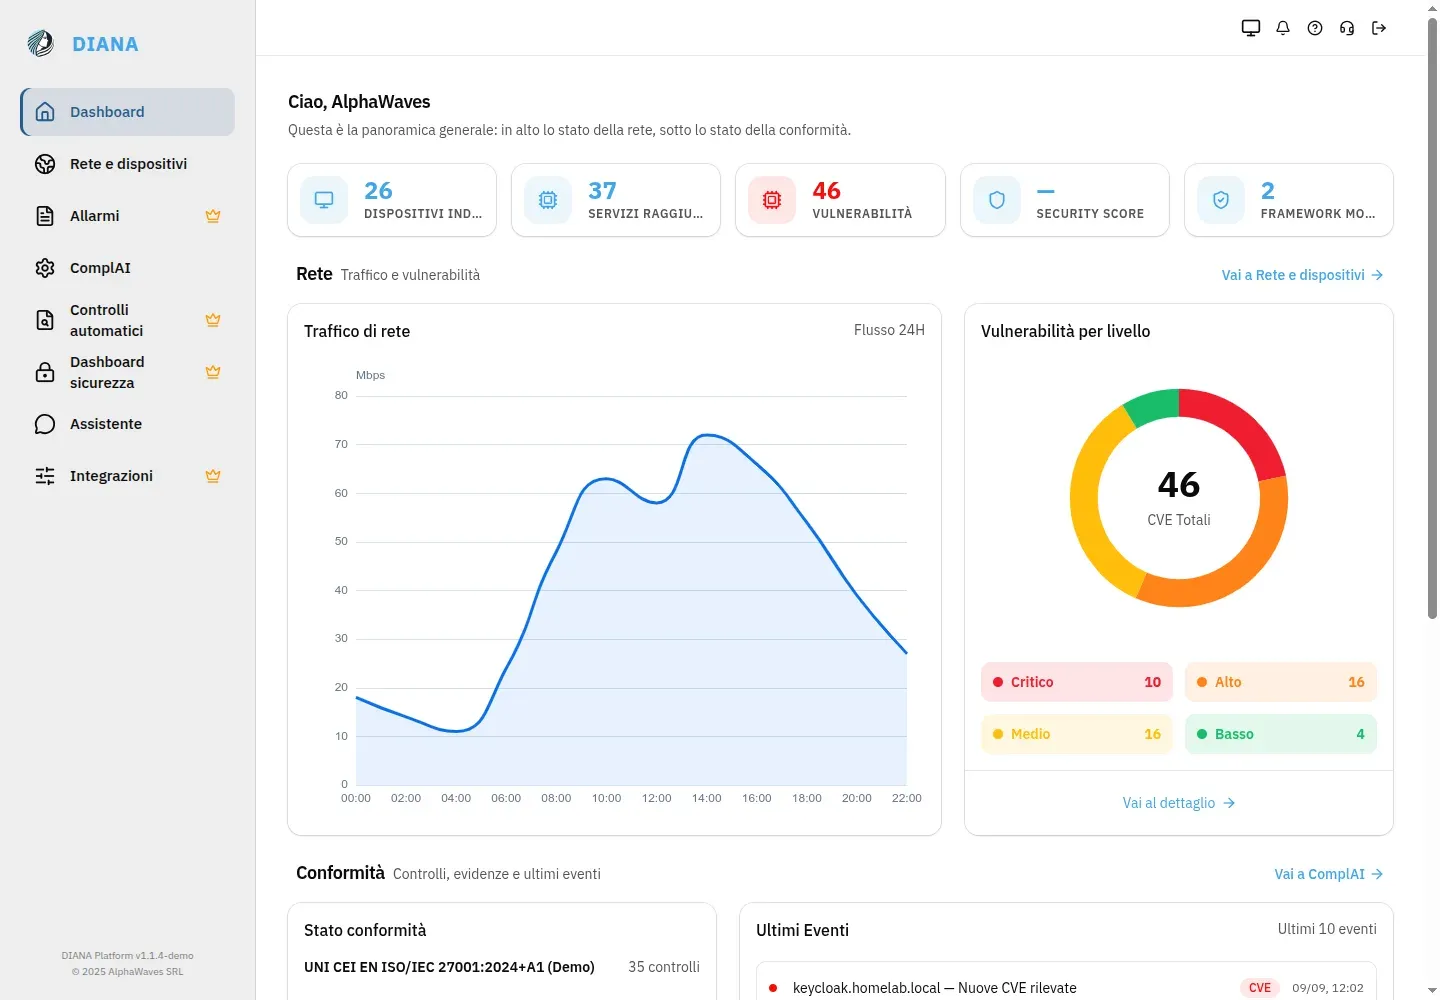
Dashboard
The overall dashboard: key indicators, network traffic chart, risk and vulnerability (CVE) breakdown, compliance summary and the most recent audit events.
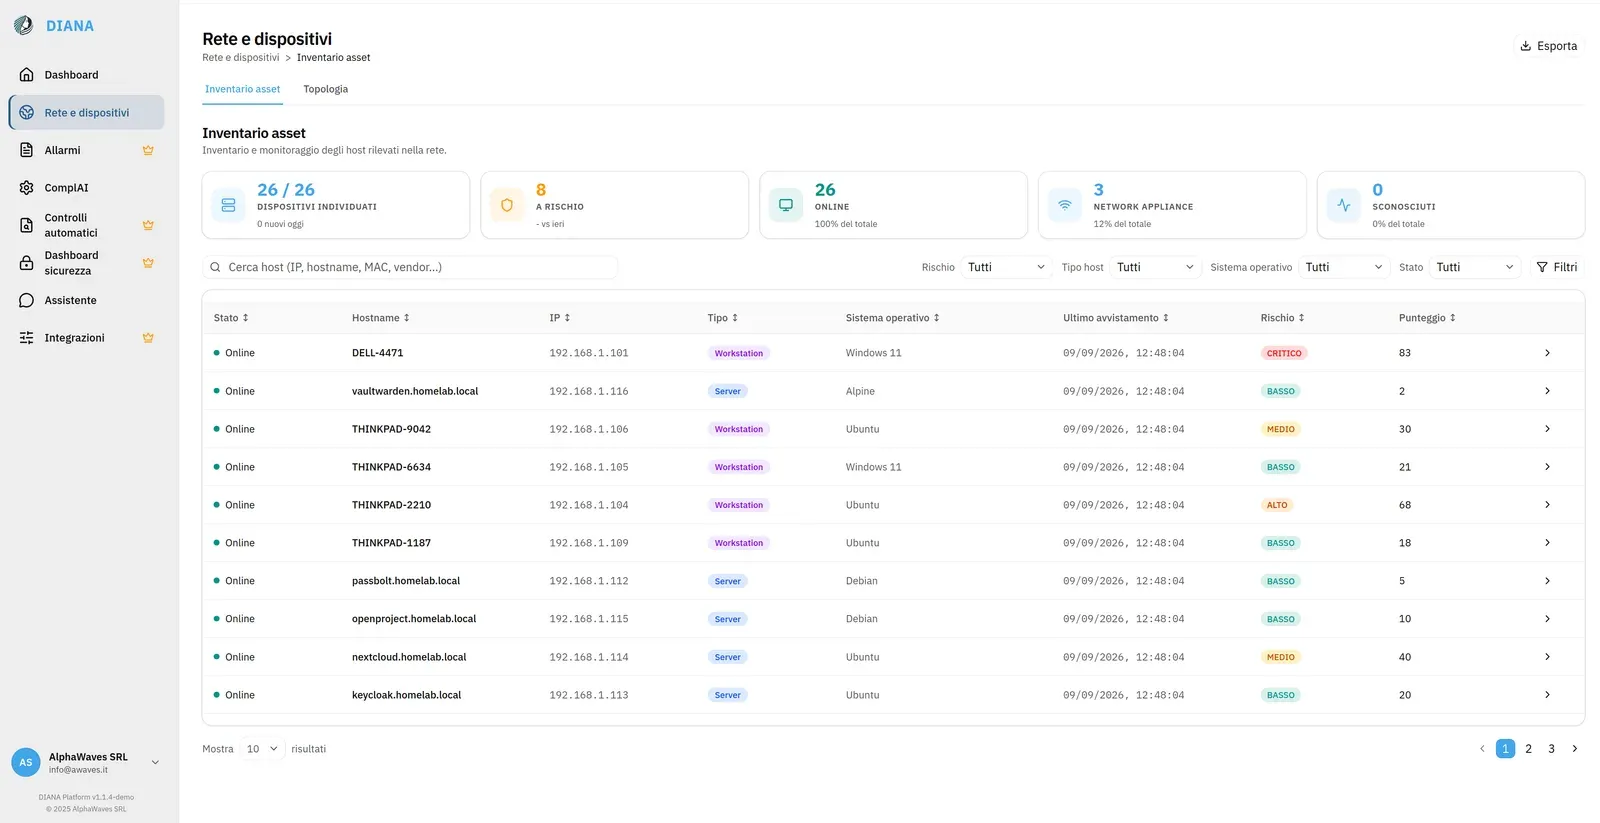
Network and devices
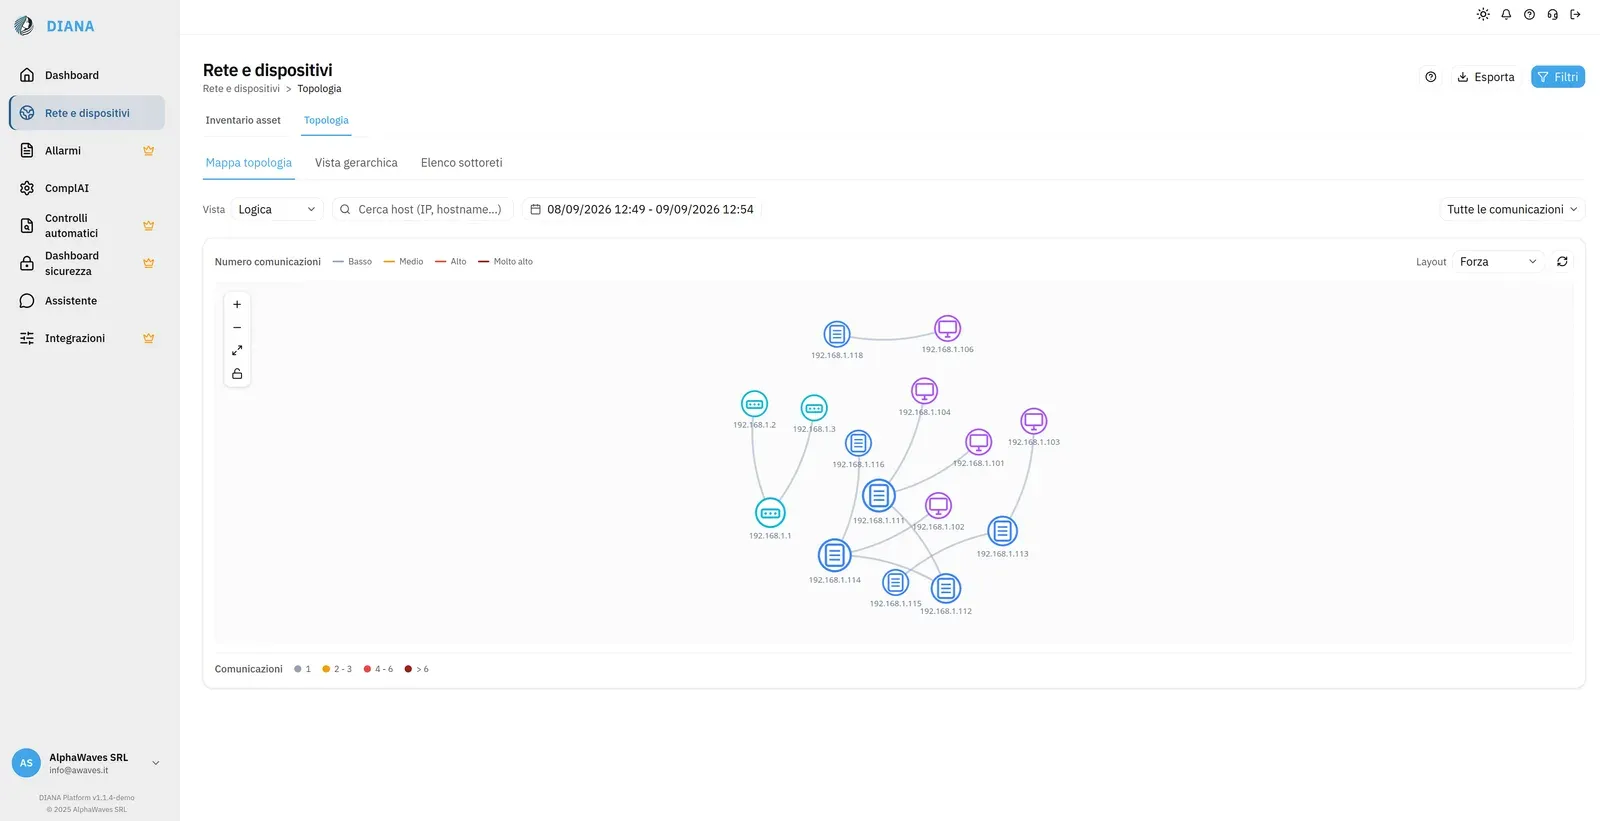
Browse the inventory of discovered devices, filter the results and export them to PDF. From a dedicated card you can also open the Topology view.
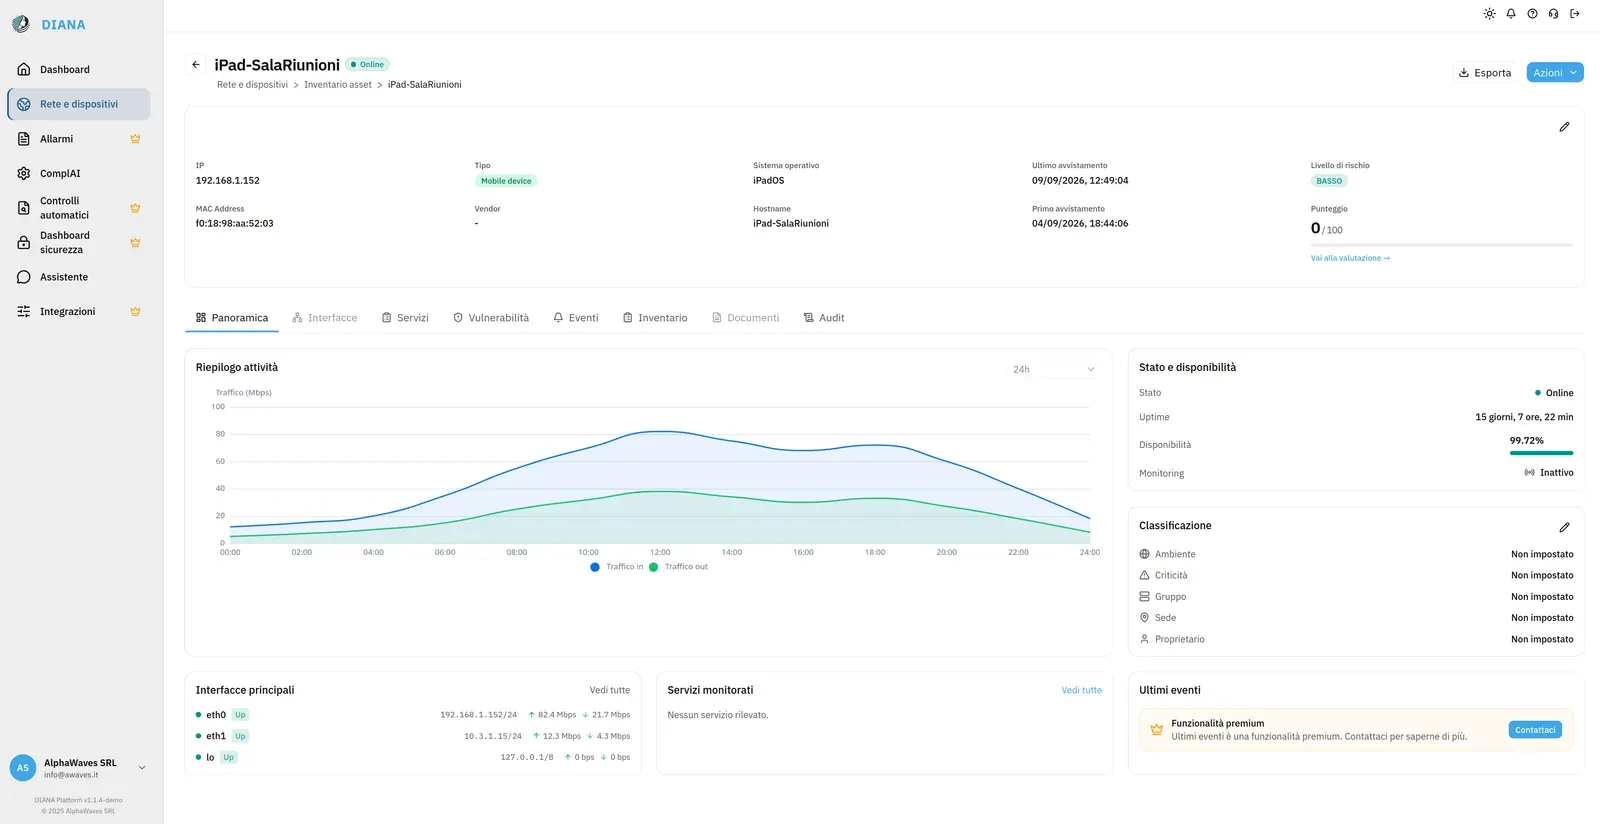
Device detail
Opening a host from the inventory shows its full record: overview, services, vulnerabilities, events, software inventory and change history.
Security Center
A summary view by security domain — assets, vulnerabilities, network, access control — each with its own indicators.
Alerts and Automated checks
These sections let you manage security alerts and automated checks. For access conditions, see Premium features.
Changing mode later
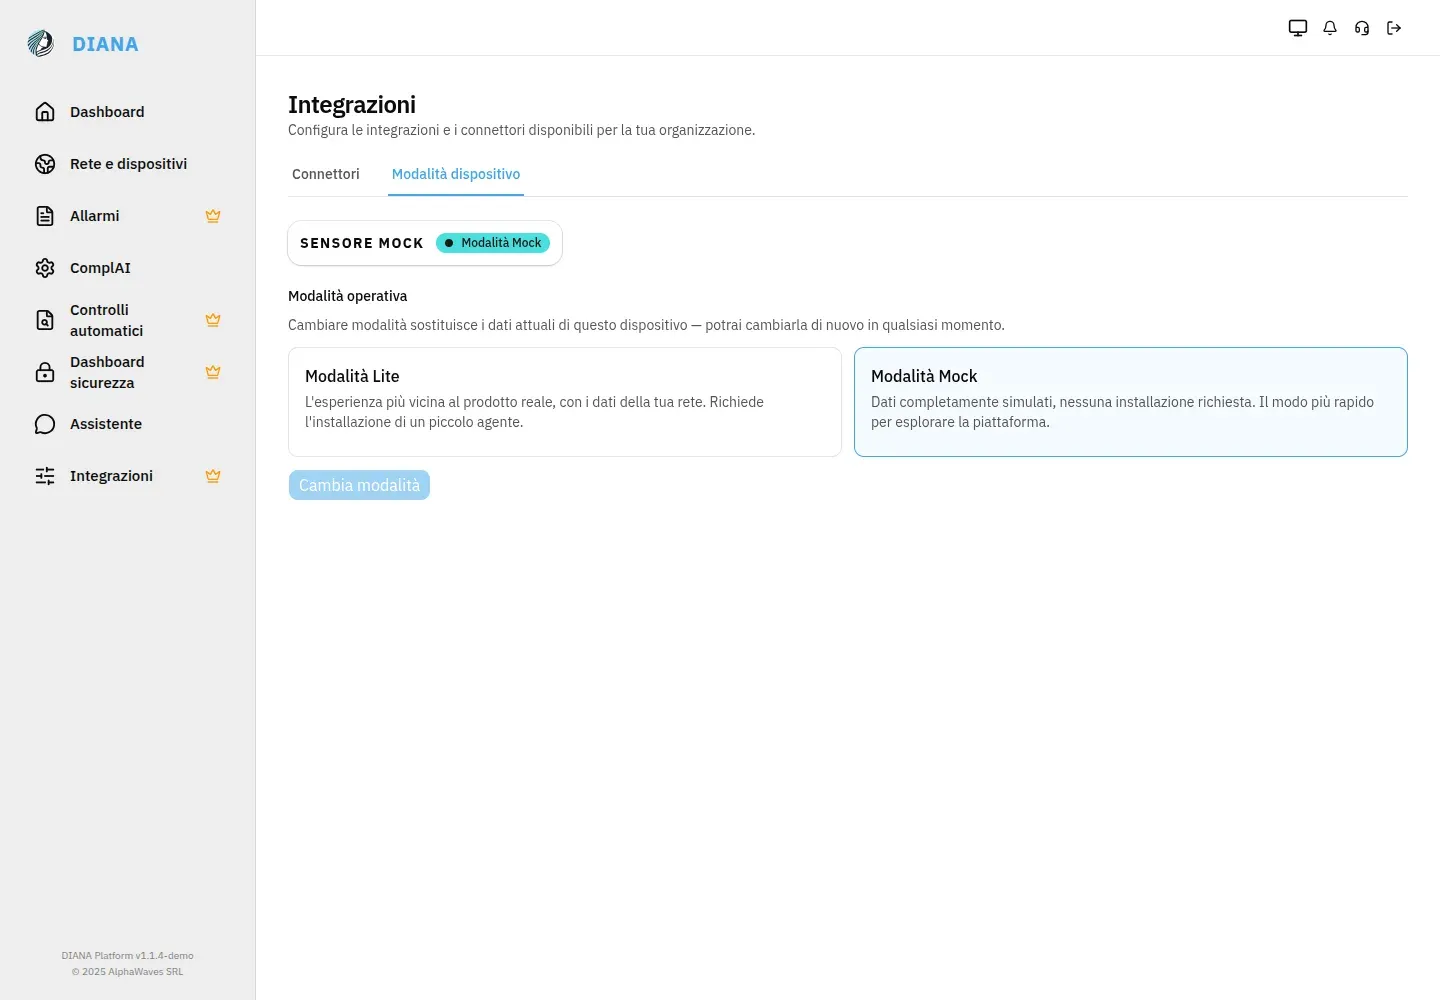
To change mode, open Integrazioni → Modalità dispositivo ("Integrations → Device mode"), choose the option you want, select Cambia modalità ("Change mode") and confirm.
Warning: every mode change permanently deletes all data recorded for that device (hosts, vulnerabilities and links). Going back to the previous mode does not restore the deleted data. Switching to Lite also generates new credentials, shown in the Il tuo dispositivo è pronto ("Your device is ready") panel.
Premium features
The free trial includes both Mock and Lite mode. You can explore DIANA with simulated data or use the desktop client to analyze your own network.
To also get access to Allarmi ("Alerts"), Controlli automatici ("Automated checks"), Dashboard sicurezza ("Security dashboard") and third-party connectors, contact us. These features are marked with a crown icon.
ComplAI
ComplAI is the DIANA module that helps you assess your company documentation against the requirements of regulations and standards, such as ISO 27001 or NIS 2, and organize the work needed to close the gaps found.
The process starts from your documents: ComplAI analyzes their content, links it to the requirements of the chosen framework and prepares the information needed to run the Gap Analysis. The result lets you understand which requirements are covered, which need extra work, and which activities to start.
You can follow this path entirely from the web application, without installing DIANA LITE.
1. Choose the reference framework
A framework collects the requirements against which you want to assess your organization. In the platform, individual requirements are organized into controlli ("controls").
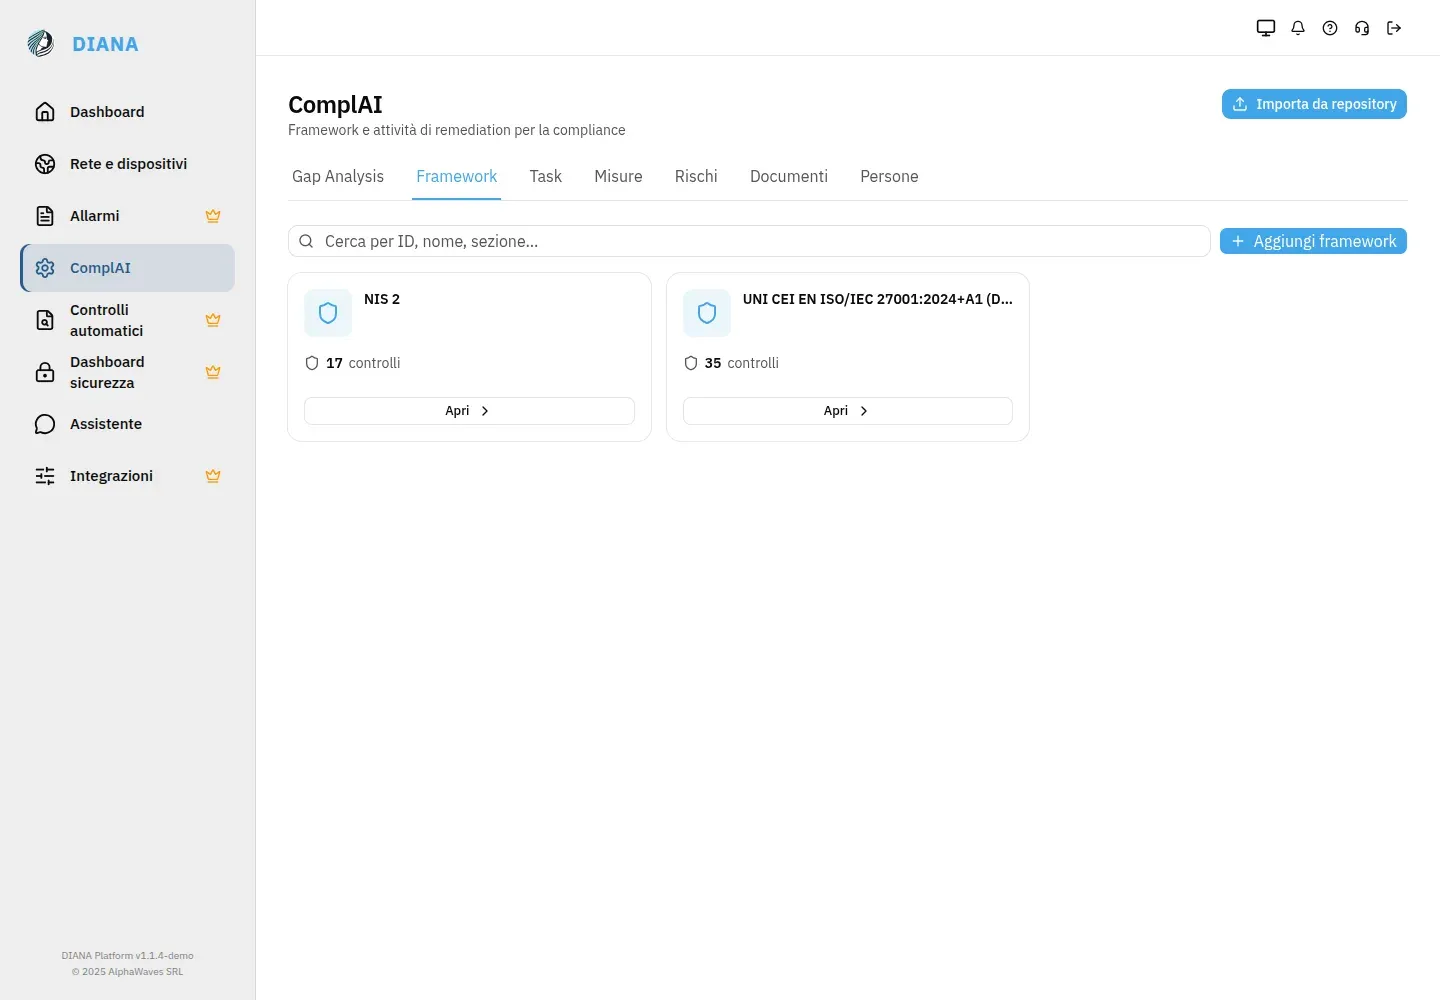
If you already chose a regulation or standard during company setup, you'll find the framework under ComplAI → Framework. To add another one:
- Open ComplAI from the sidebar and select the Framework tab.
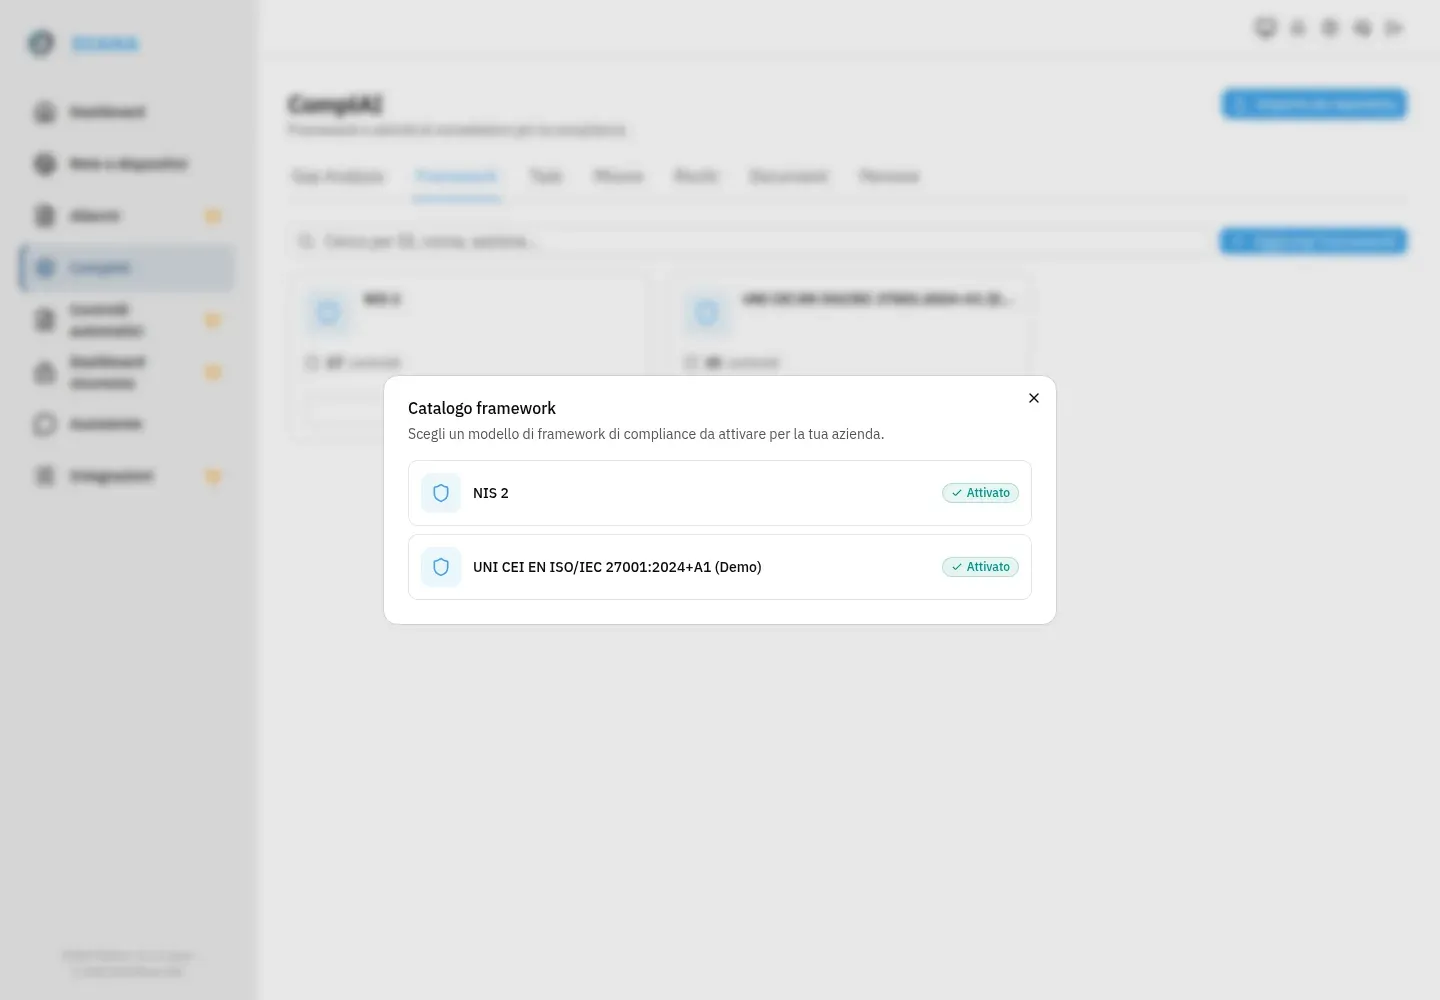
- Select Aggiungi framework ("Add framework").
- Choose a template from the catalog and select Attiva ("Activate").
Opening the framework lets you browse its structure and controls. Each control can be linked to documents and measures, keeping the requirement and the information describing how it's implemented together.
2. Import your company documents
Prepare the documents that describe how your company operates: for example security policies, operating procedures, contracts and documentation about the measures you've adopted.
Documents in the demo version: uploaded files are used for the analysis, and keeping them beyond this stage isn't guaranteed. Keep the originals in your company archive.
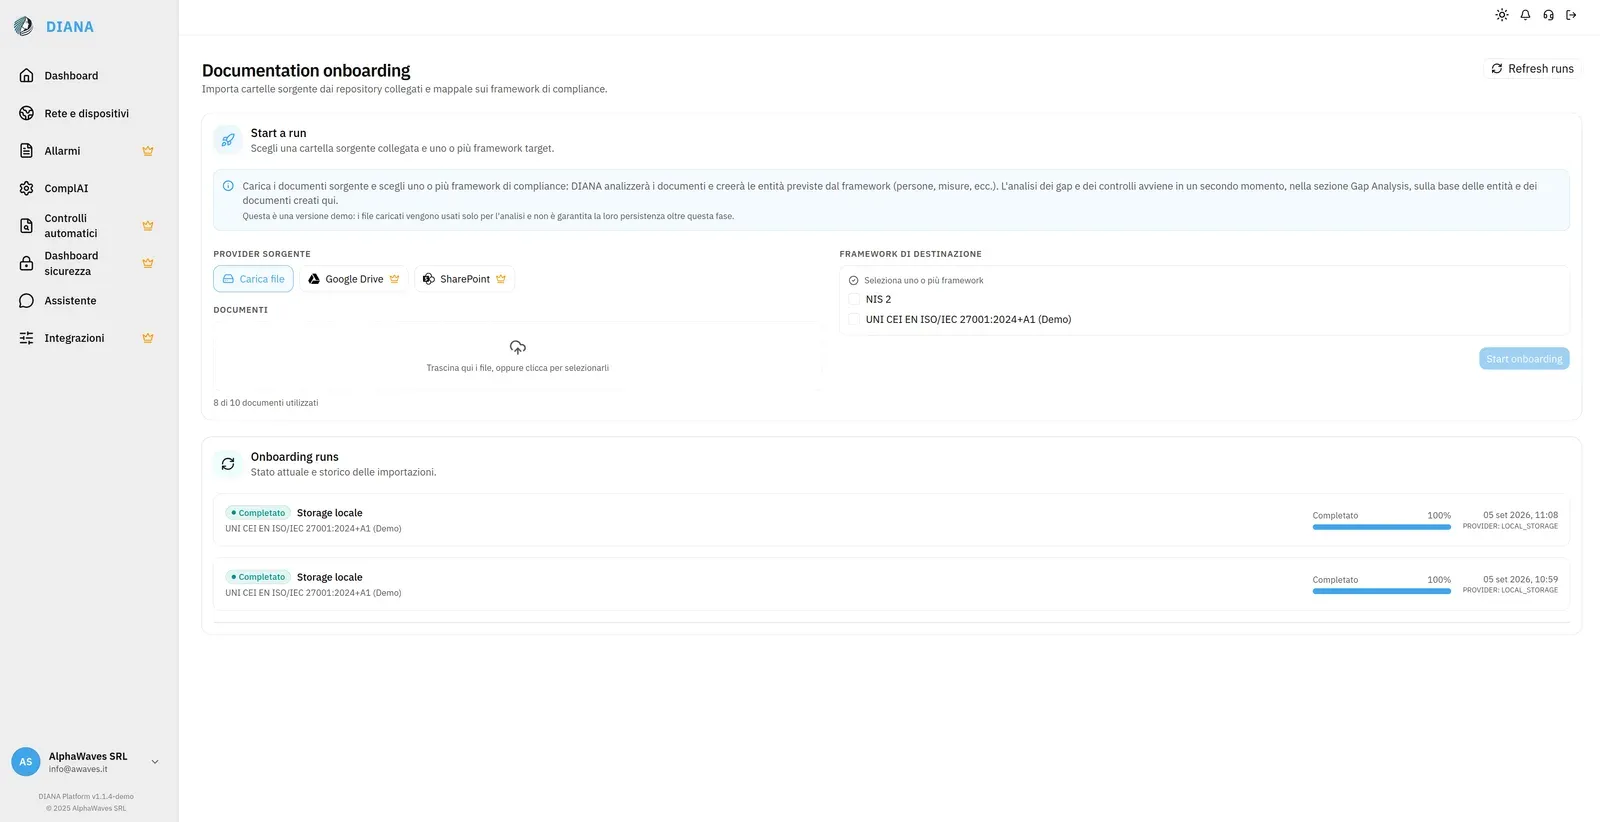
From ComplAI, select Importa da repository ("Import from repository") to open the import flow, called onboarding documentale ("document onboarding") in the application.
- Choose Carica file ("Upload files") and select or drag documents from your computer. If you use a connected repository available on your plan, you can select the source folder instead.
- Select one or more Framework di destinazione ("Destination frameworks").
- Select Start onboarding to start processing.
- Follow the progress in the import history and wait for it to complete.
At this stage, DIANA analyzes the documents, extracts information such as people and measures, and links it to the selected frameworks. Onboarding then prepares the documentation and organizational base for the next step: the Gap Analysis.
3. Run the Gap Analysis
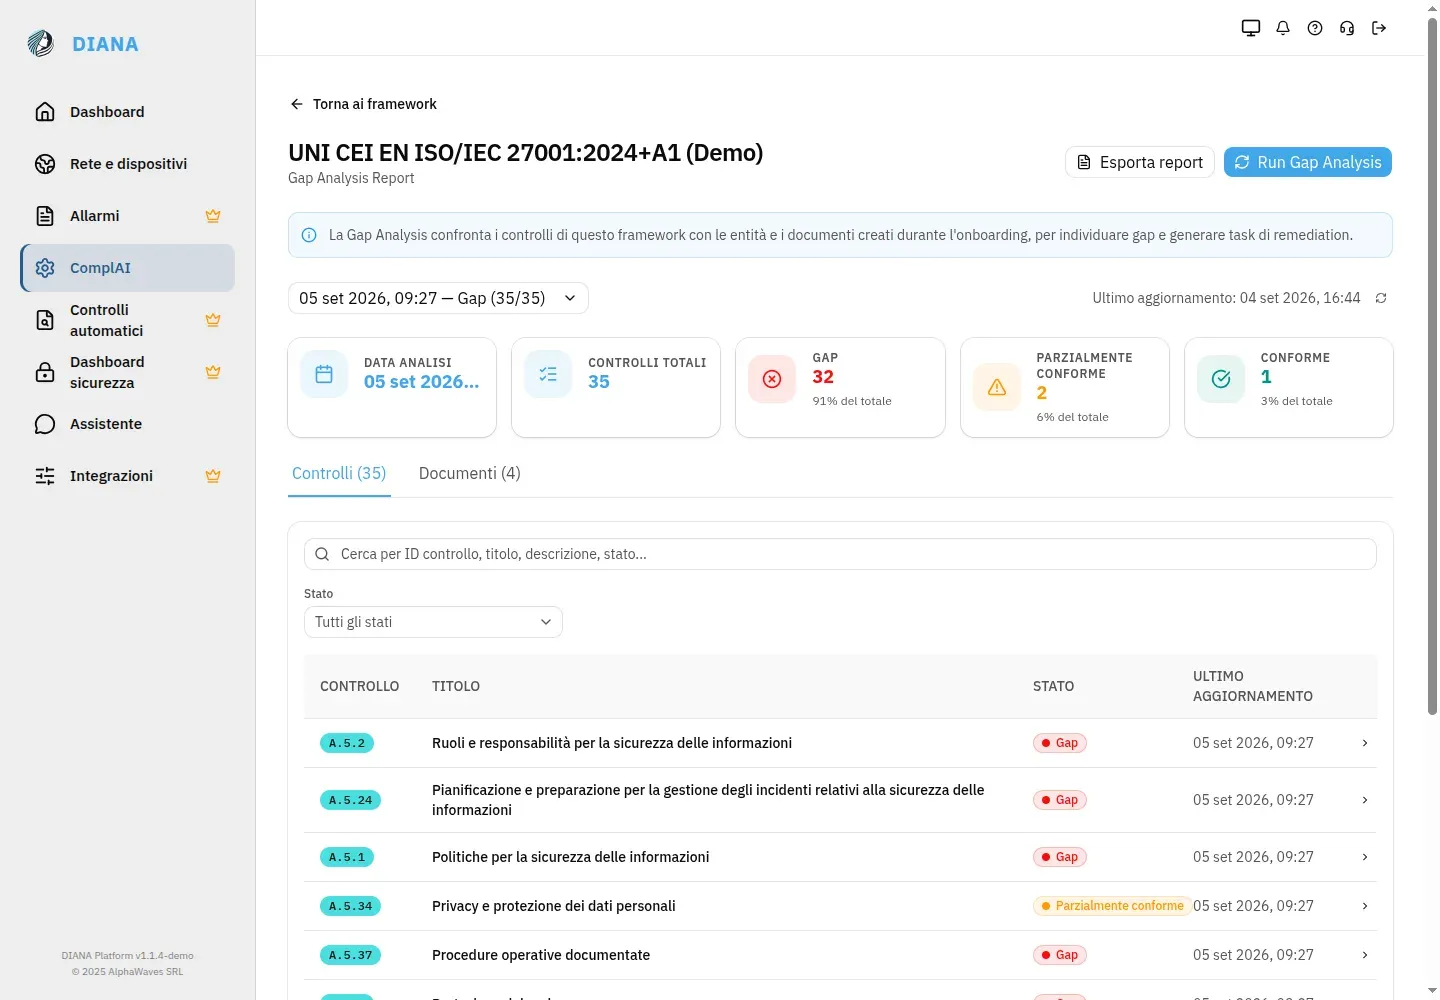
The Gap Analysis compares the framework's controls with the documents and information processed during onboarding. It's used to identify gaps against the requirements and the actions needed to address them.
- Open the Gap Analysis tab in ComplAI.
- Open the framework you want to analyze.
- Select Run Gap Analysis.
- Wait for it to complete and review the report.
If no document has been mapped yet for that framework, the platform invites you to complete onboarding first via Vai all'onboarding ("Go to onboarding").
4. Read the report and review controls
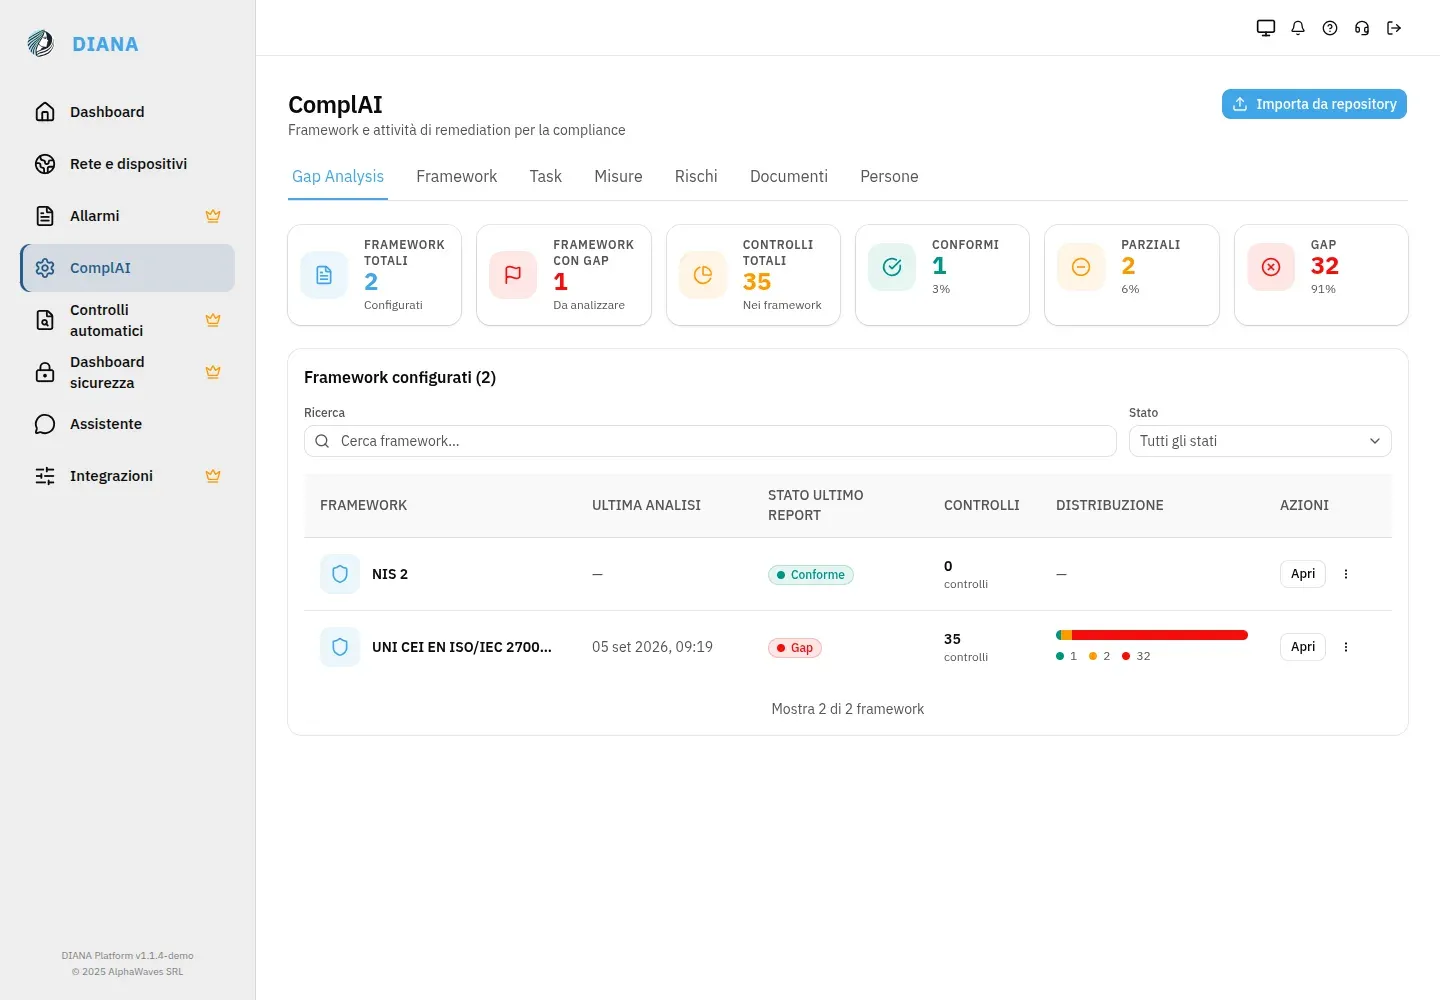
The report presents a summary of the analysis and the distribution of controls across three states:
- Conforme ("Compliant") — the control is covered by the information analyzed.
- Parzialmente conforme ("Partially compliant") — some requirements are covered, but further work is needed.
- Gap — the analysis finds gaps, or insufficient information to document how the requirement is implemented.
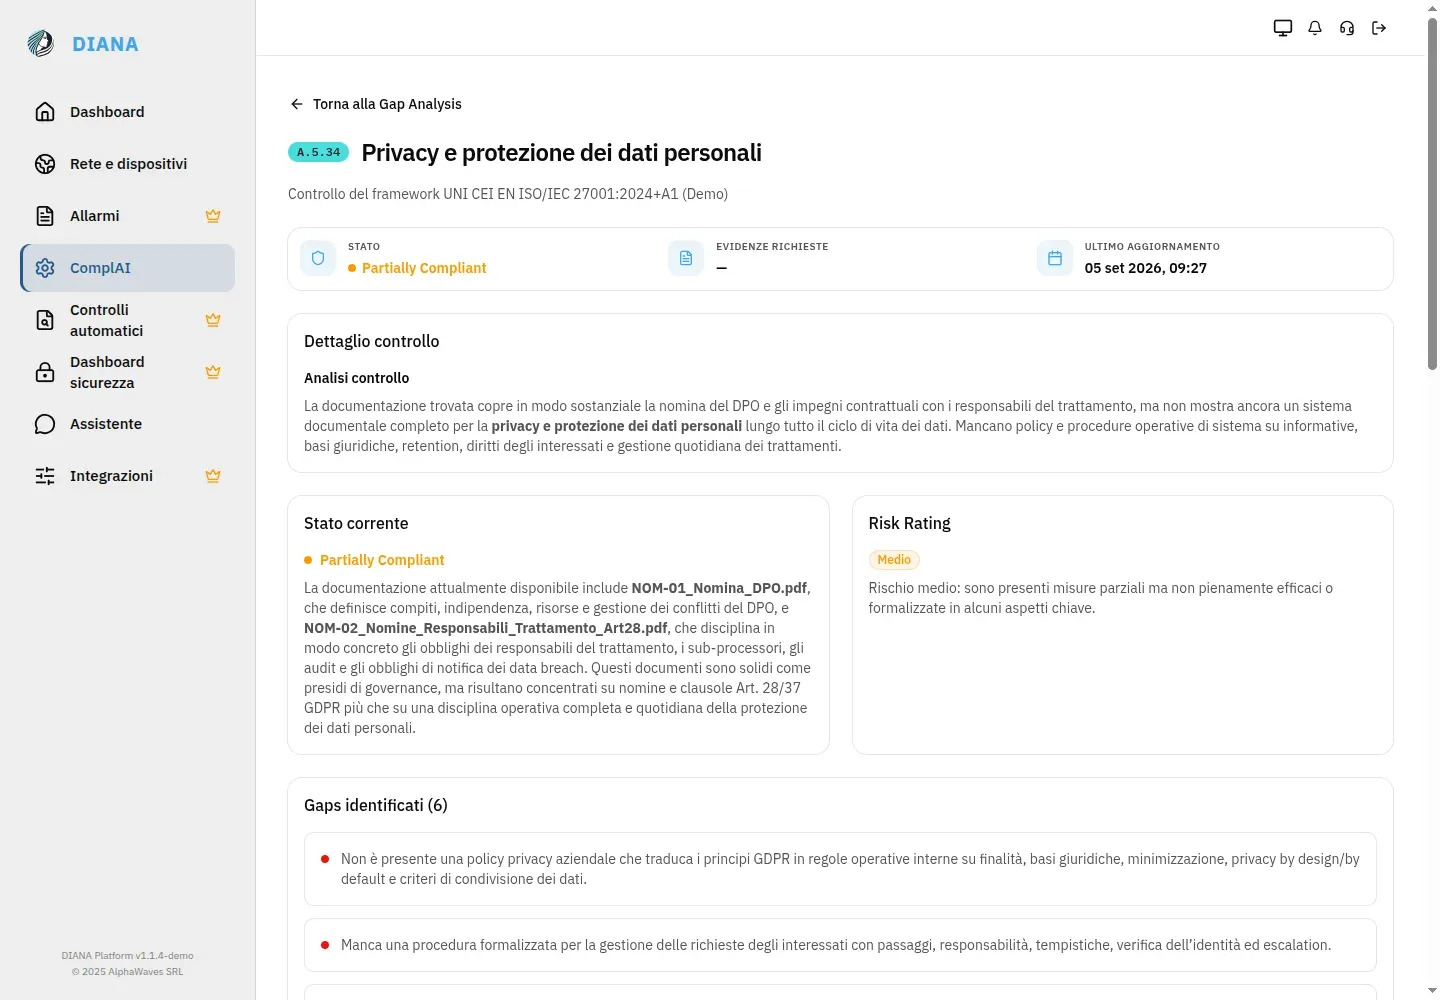
You can filter controls by state and open the ones that need attention. The detail view shows the requirement's description, the current-state analysis, the gaps identified, the proposed actions and the linked documents and measures.
For example, if a procedure describes access management but doesn't clarify how authorizations are reviewed, the analysis can flag this as an area to work on. From the control you can open the reference document and organize the necessary activity.
Select Esporta report ("Export report") to download the report as a PDF. The Analisi precedenti ("Previous analyses") section also lets you review past results.
5. Organize improvement activities
From the analysis results you can move into operational management. ComplAI's tabs keep requirements, documentation and activities linked together:
| Section | How to use it |
|---|---|
| Task | Organize the activities to carry out, assign an owner and set priority, due date and progress status. From a control's detail view you can select Crea task ("Create task") to log an activity starting from a proposed action. |
| Misure ("Measures") | Manage the technical and organizational measures adopted or to be implemented, linking them to controls, documents, risks and tasks. |
| Rischi ("Risks") | Record risks, assess likelihood and impact, and keep them linked to the relevant measures and documents. |
| Documenti ("Documents") | Browse imported documents, available analyses and the links to controls, measures and risks. |
| Persone ("People") | Manage the people involved, with name, email and role. |
To get started, open a control with a gap, review the proposed action and create the related task. Assign the activity to the responsible person and update its status as the work moves forward.
6. Review documents and refresh the analysis
Besides the framework report, you can also review the analysis of a single document. Open it from the Documenti tab: the Panoramica ("Overview") shows the available result, with commentary, strengths and areas for improvement. The Avvia nuova analisi ("Start new analysis") button lets you request a new evaluation of the document.
When you update your company documentation, import or sync the updated content and complete the necessary processing. You can then re-run the framework's Gap Analysis and review the new report alongside previous ones.
This way, ComplAI supports you through the whole journey: from gathering documentation, to understanding the gaps, to tracking improvement activities.
Installing and using DIANA LITE
If you chose Lite mode, follow these instructions to install, configure and use the DIANA LITE desktop client on Windows and Linux.
What is DIANA LITE
DIANA LITE is an application that automatically discovers the devices connected to your local network, for example:
- computers;
- printers;
- other devices connected by cable or Wi-Fi.
The information it detects is sent to the DIANA platform, where it's analyzed for network security purposes.
DIANA LITE only observes the devices present on the network and does not make any changes to the devices it finds.
In addition:
- on both Windows and Linux, no administrator privileges are required for everyday use (on Linux, the user password may be requested only to install the package);
- no hidden drivers or extra components are installed;
- virtual networks, VPNs and the networks used by virtual machines (Docker, Hyper-V, VMware, VirtualBox, WireGuard, corporate VPN tunnels, etc.) are automatically excluded from scanning;
- ports associated with industrial and automation protocols (for example Modbus, S7, PROFINET, BACnet, EtherNet/IP, OPC UA) are never queried during scanning: devices exposing them can still be discovered on the network, but DIANA LITE never probes those specific ports, so as not to interfere with sensitive systems.
In short
To use DIANA LITE you need to:
- download the program from the DIANA platform (after choosing Lite mode, see above);
- run it on the computer connected to the network you want to monitor (on Linux, after installing it; on Windows no installation is needed);
- enter the Username and Password provided by the platform;
- press Avvia ("Start").
Requirements
Make sure you have:
- a computer running Windows (11, 10) or Linux (Ubuntu 22.04, 24.04, 26.04 or Debian 12, 13);
- an active network connection, wired or Wi-Fi;
- an active account on the DIANA web application;
- Lite mode active for the device, and the credentials saved during activation (see Start the analysis with Lite).
Important: the Username and Password are shown only once. Copy both of them and store them somewhere safe before leaving the page.
Starting on Windows
DIANA LITE on Windows requires no installation: it's a single portable executable.
1. Download the program
From the device activation page on the DIANA platform, after selecting Windows as the operating system, download the file:
DIANA.exe
Save the file somewhere easy to find, for example on the Desktop or in a dedicated folder. You'll use the same file for every future launch.
2. Start DIANA LITE
Double-click DIANA.exe to start the application.
The application opens directly. No shortcut is created in the Start menu: to reopen DIANA LITE, double-click the same file again.
Starting it does not require the Windows administrator password.
If the Windows protected your PC warning appears, see the troubleshooting instructions.
Installing on Linux
DIANA LITE is distributed for Linux as a .deb package, built separately for each supported distribution and version: Ubuntu 22.04, 24.04, 26.04 and Debian 12, 13.
On the device activation page, select your computer's distribution and version before downloading the package: the file will have a name like ubuntu24.04.deb or debian12.deb, depending on your choice.
If you use a derivative distribution, such as Linux Mint, Pop!_OS or elementary OS, choose the package for the Ubuntu/Debian version it's based on. Compatibility with distributions or versions not listed here isn't guaranteed. If in doubt, contact DIANA support.
Installing via the graphical interface
For most users this is the simplest method.
- Download the
.debfile from the DIANA platform. - Double-click the downloaded file, for example:
ubuntu24.04.deb
- Your system's package manager will open, for example Software on Ubuntu.
- Select Installa ("Install").
- If prompted, enter your Linux user password.
- Once installation finishes, you'll find DIANA among your installed applications.
On Linux you may be asked for your user password while installing the package. Once installed, DIANA LITE works without needing any special privileges.
Installing from the terminal — alternative
This step is optional, for anyone who prefers using the terminal.
Open a terminal in the folder where you saved the .deb file and run:
sudo apt install ./ubuntu24.04.debReplace ubuntu24.04.deb with the exact name of the file you downloaded (it depends on the distribution and version you chose).
First launch: activating the device
On first launch, instead of the main screen, DIANA LITE shows the panel directly:
Attiva questo dispositivo ("Activate this device")
with three numbered instructions and two fields to fill in:
- Open
https://try.dianasecurity.comand go to this device's page. - Copy the Username and Password.
- Paste them into the Username and Password fields.
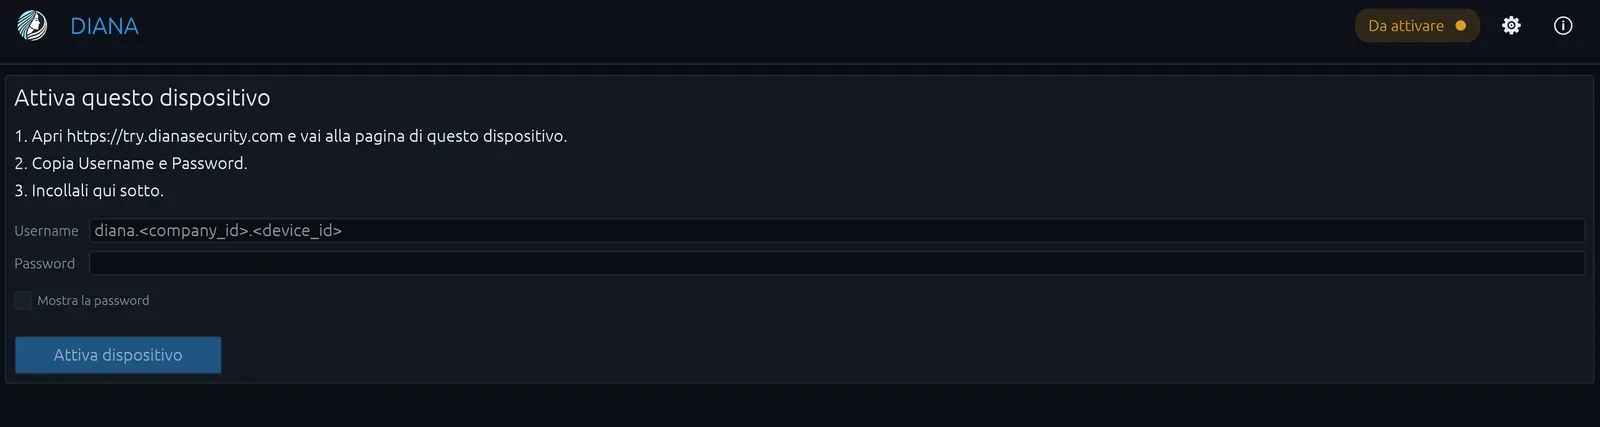
Use the credentials saved from the device activation page on the DIANA platform. They're shown only once: if you didn't keep them, see I forgot the device password, what do I do?.
Copy them exactly as shown.
While you type the Username, DIANA LITE checks its format and shows an on-screen hint:
- Username riconosciuto ("Username recognized") — the format is correct;
- an amber warning if the Username looks incomplete: check that you copied it in full.
You can use the Mostra la password ("Show password") option to check you've entered it correctly.
Once both fields are filled in, select:
Attiva dispositivo ("Activate device")
During verification, a loading indicator appears next to the "verifica in corso col broker…" ("verifying with the broker…") message. DIANA LITE tries to connect to the server and only saves the credentials on the computer once they've been accepted.
What can happen after verification
Credentials accepted
If the Username and Password are correct, the panel shows "Dispositivo associato" ("Device linked"). The button then appears:
Continua ("Continue")
Select it to close the activation form and move to DIANA LITE's main screen.
The panel shows "Non valide"
If verification fails, the red text "Non valide" ("Invalid") appears under the fields. Read the message that follows and see the activation troubleshooting steps.
To update the credentials of a device that's already active, select Cambia configurazione ("Change configuration") in the Diagnostica ("Diagnostics") window. This reopens the Attiva questo dispositivo form.
Starting and stopping the scan
Once activation is complete (or right at launch, if the device is already active), DIANA LITE's main screen appears.
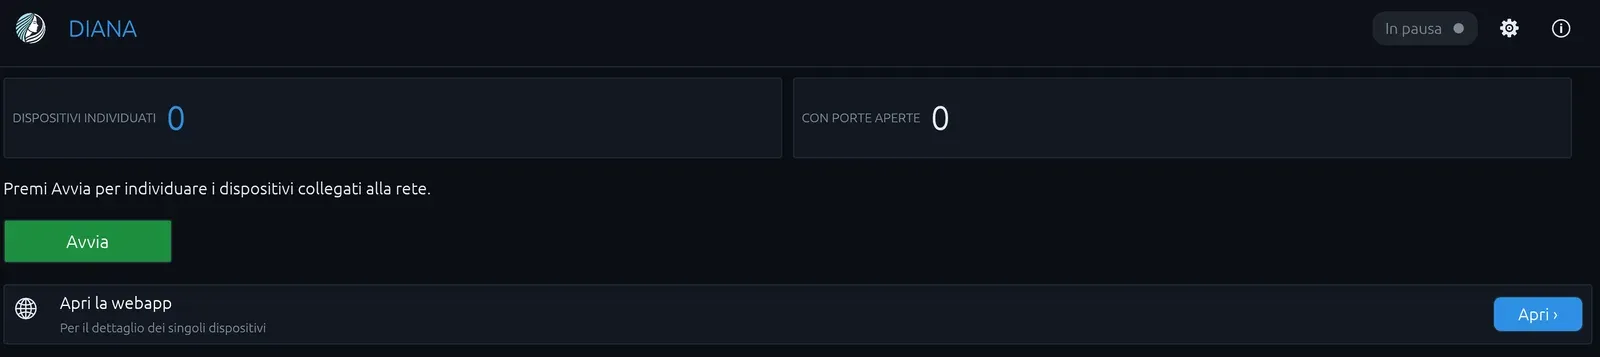
On this screen you'll find:
- at the top, a bar with the DIANA logo, the ℹ Diagnostica ("Diagnostics") and ⚙ Impostazioni ("Settings") buttons, and a colored indicator for the device's status;
- two counters: dispositivi individuati ("devices found") and con porte aperte ("with open ports");
- a line of text explaining the current status;
- the most recent alerts, if any (up to two), with a Vedi dettagli ("See details") link that opens Diagnostics;
- the Avvia ("Start") button (or Ferma / "Stop", depending on status);
- an Apri la webapp ("Open the web app") panel, to open the device details on the DIANA platform in your browser.
Starting the scan
Select the green button:
Avvia ("Start")
The scan starts immediately.
DIANA LITE will then keep running new scan cycles automatically, at regular intervals.
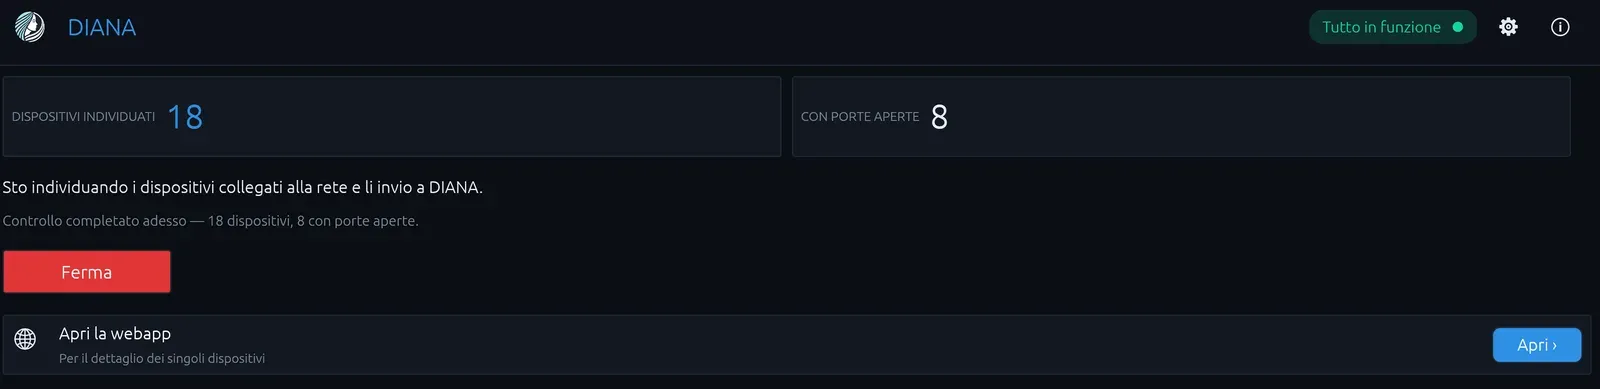
While the scan is running, the Avvia button becomes:
Ferma ("Stop")
While stopping, the button briefly shows Arresto… ("Stopping…") and is temporarily disabled until the current cycle finishes.
Temporarily stopping the scan
Select Ferma on the main screen. DIANA LITE finishes the current cycle, then stops scanning.
To resume, select Avvia again. There's no need to reinstall or reconfigure the program.
How to tell if DIANA LITE is working
The colored indicator in the top right shows the device's status. Below the two counters you'll find a short description of the current status. The possible states are:
- Da attivare ("To activate", amber) — this computer isn't connected to DIANA yet: complete the activation.
- In pausa ("Paused", grey) — the device is active but scanning hasn't started yet: press Avvia.
- Avvio in corso… ("Starting…", blue) — the scan has just started and DIANA LITE is still connecting to the server.
- Tutto in funzione ("Everything running", teal) — the scan is active and data is being sent to DIANA regularly.
- DIANA non raggiungibile ("DIANA unreachable", amber) — the scan continues, but sending data to the server isn't currently possible. DIANA LITE retries automatically.
- Solo in locale ("Local only", amber) — the scan is active, but the device isn't activated yet: the data stays on the computer.
- Gestito dal servizio ("Managed by the service", blue) — the background service is handling data delivery. You can keep reviewing the results in the application.
- Arresto in corso… ("Stopping…", amber) — you selected Ferma and DIANA LITE is finishing the current cycle before it stops.
You can also check the scan results via the dispositivi individuati and con porte aperte counters.
Settings
For everyday use, you don't need to change any settings.
The default values suit most situations.
If needed, selecting the ⚙ button (top right) opens the Impostazioni ("Settings") window.
Networks to monitor
At the top of the window you'll find the list of detected network interfaces. Check or uncheck the subnet boxes to include or exclude them from scanning.
Virtual networks, including those tied to VPNs and virtual machines, are already excluded automatically and don't appear in the list.
The Rileggi reti ("Rescan networks") button refreshes the list of available networks. This can be useful, for example, if:
- you switched Wi-Fi networks;
- you connected or disconnected a network cable;
- your computer's network connection changed.
How often to recheck the network
The slider lets you change the time between one scan cycle and the next (from a minimum of 5 seconds to a maximum of 5 minutes).
If you have no special needs, you can leave the default value.
Running in the background
On Windows, the "Continua in background alla chiusura della finestra" ("Keep running in background when the window is closed") checkbox lets you configure DIANA LITE to keep running even after you close the main window: in this case the application stays available in the notification area (system tray), from which you can reopen or fully close it.
This feature isn't available on Linux: the checkbox is disabled, with the note "Non disponibile su questo sistema: l'area di notifica richiede GTK." ("Not available on this system: the notification area requires GTK.") On Linux, closing the window closes the application normally and stops the scan.
Networks that are too large
When a detected network is too large to be analyzed in a single cycle, DIANA LITE examines one portion at a time. Expand the Reti troppo grandi ("Networks too large") section to choose which portion to analyze: use the ⏴ and ⏵ buttons, or enter the subnet in CIDR format, for example 10.3.7.0/24.
If no network exceeds the limit, there's no need to narrow the scan range.
Change configuration
To update the device's credentials, open the Diagnostica window (the ℹ button) and select Cambia configurazione.
The same form also opens automatically from the main screen, via the Cambia configurazione link that appears when the credentials seem to no longer be valid.
Uninstalling
Uninstalling DIANA on Windows
Since the program doesn't require installation, it doesn't show up in App installate ("Installed apps") and has no uninstaller.
To remove the program, simply delete the DIANA.exe file you downloaded.
If you also want to remove the saved credentials, delete this folder too:
%APPDATA%\AlphaWaves\DIANA
Uninstalling DIANA on Linux
You can use your system's Software application:
- search for DIANA;
- select Rimuovi ("Remove").
Alternatively, you can use the terminal:
sudo apt remove diana-desktopFrequently asked questions
Network analysis and DIANA LITE
What's the difference between Mock and Lite?
Mock mode shows simulated data and requires no installation. Lite mode uses the DIANA LITE desktop client to collect information about the devices connected to your local network.
What happens to the data when I change mode?
Every switch between Mock and Lite permanently deletes the hosts, vulnerabilities and links recorded for that device. Going back to the previous mode doesn't restore the data. Switching to Lite also generates new credentials.
Do I need to be a computer administrator?
Windows
No.
DIANA LITE runs directly from the DIANA.exe file, with no installation and no administrator privileges.
Linux
While installing the .deb package, you may be asked for your user password, just as with installing any other program.
After installation, DIANA LITE works without needing any special privileges.
Does DIANA LITE change devices on the network?
No.
DIANA LITE's activity is limited to observing the devices found on the network.
Does DIANA LITE slow down the computer or the network?
The scan is designed to be lightweight and runs at regular intervals rather than continuously.
If needed, you can stop it at any time by selecting Ferma.
Can I use the same credentials on multiple computers?
No.
Each Username/Password pair identifies a single device.
If you use the same credentials on two different computers at the same time, the two clients may repeatedly disconnect each other.
To use DIANA LITE on multiple computers, you therefore need separate credentials for each device.
I forgot the device password, what do I do?
The password is shown only once and can't be retrieved afterwards. If you've lost it, you can generate new credentials from the DIANA platform by following these steps.
- Log in to the DIANA web platform and go to Integrazioni ("Integrations") in the sidebar.
- Open the Modalità dispositivo ("Device mode") tab.
- Select Modalità Mock ("Mock mode") and confirm the change.
- Select Modalità Lite ("Lite mode") again and confirm: the platform generates new credentials (Username and Password) for the device.
- Save the new credentials right away and enter them in DIANA LITE via Cambia configurazione, in the Diagnostica window.
Warning: changing mode (Lite → Mock → Lite) deletes all data currently recorded for that device (hosts found, vulnerabilities, links).
Is the connection to the server secure?
DIANA LITE communicates with the server over a secure connection.
Keep your credentials somewhere safe and don't share them with unauthorized people.
How do I temporarily stop the scan?
Select the Ferma button on the main screen.
When you want to resume, select Avvia again.
Why don't I see all the computer's networks?
DIANA LITE intentionally excludes some virtual networks from scanning, including:
- VPNs;
- networks used by virtual machines;
- virtual networks created by other programs.
For this reason, it's normal for not every network shown by the operating system to also appear in the Reti da controllare ("Networks to monitor") list, under Impostazioni ("Settings").
Questions about ComplAI
Do I need to install DIANA LITE to use ComplAI?
No. Document import, Gap Analysis and activity management all happen directly in the DIANA web application.
Which documents can I use to get started?
You can start with the documents that describe your company's organization and the measures it's adopted: security policies, operating procedures, contracts and other documentation relevant to the chosen framework.
Are uploaded documents kept?
In the demo version, uploaded files are used for the analysis and keeping them beyond this stage isn't guaranteed. Keep the originals in your company archive.
What's the difference between import and Gap Analysis?
Import, or document onboarding, analyzes the documents, extracts information and links it to the selected frameworks. Gap Analysis uses this base to assess controls, identify gaps and propose improvement actions. Complete the import before running the Gap Analysis.
Can I analyze the same documents against multiple frameworks?
Yes. During onboarding you can select multiple Framework di destinazione ("Destination frameworks"). Once processing is complete, run the Gap Analysis for each framework you want to assess.
How do I refresh the analysis after editing a document?
Import or sync the updated version and complete processing. To evaluate a single document, open it from the Documenti tab and select Avvia nuova analisi. To refresh the framework's report, run Run Gap Analysis again from its page.
Troubleshooting and support
Issues with DIANA LITE
"Windows protected your PC" appears
Windows may show this warning because DIANA LITE doesn't currently have a certified digital signature recognized by the system.
If you downloaded the file directly from the DIANA platform:
- select Ulteriori informazioni ("More info");
- select Esegui comunque ("Run anyway").
If you're not sure where the file came from, first check that you used the download available on the DIANA platform.
I see "Activate this device" instead of the main screen
DIANA LITE doesn't yet have a valid configuration. The status indicator at the top shows Da attivare ("To activate").
Enter the Username and Password as described in the First launch: activating the device section.
In the Diagnostics window, "Connessione al broker…" stays shown instead of "Broker connesso"
The indicator stays amber and the connection to the server doesn't complete. This can depend on your internet connection or the credentials you entered.
Check:
- that the computer is connected to the internet;
- that the Username and Password are correct;
- that the password was entered in full;
- that there are no extra spaces or missing characters.
The connection indicators are visible in the Diagnostica window (the ℹ button) while scanning, if the device is already configured.
In the Diagnostics window, "Backend: in attesa di risposta" stays shown instead of "Backend raggiungibile"
In this case the connection to the broker is active ("Broker connesso" is already shown), but the central DIANA service isn't responding correctly.
This can be temporary.
If the issue persists, contact DIANA support. Use the Copia informazioni per l'assistenza ("Copy support information") button in the same window to include diagnostic details in your request.
No network appears in the list
Check that the computer is connected to a network:
- check that Wi-Fi is on; or
- check that the network cable is connected.
If the computer is connected only through a VPN, try disabling it temporarily.
DIANA LITE requires a physical network to be present to analyze.
Credentials are rejected
Check the credentials saved during device activation. If you didn't keep them, see I forgot the device password, what do I do?.
Make sure you copied:
- every character;
- any leading symbols;
- any trailing symbols.
Then try verifying again.
Device verification shows "Non valide"
The message below the fields indicates why verification failed:
- Il broker ha rifiutato queste credenziali. ("The broker rejected these credentials.") Check that you copied the Username and Password in full, including any leading or trailing symbols, without adding spaces. Then try again.
- Non riesco a raggiungere DIANA. ("Can't reach DIANA.") The credentials may be correct, but the computer can't reach the server. Check your internet connection and any corporate proxy, then try again.
- Lo username deve avere la forma "diana.
<company_id>.<device_id>". ("The username must have the form…") The Username format isn't valid. Part of the value may be missing, for example thediana.prefix. Check that you copied the full Username provided by the platform.
The .deb package won't install on Linux
If installation reports missing dependencies, open a terminal and run:
sudo apt --fix-broken installOnce it finishes, try installing the .deb package again.
Issues with ComplAI
I can't find a framework to select during import
Check that you've activated at least one framework in ComplAI → Framework. If you haven't set one up yet, select Aggiungi framework, choose a template from the catalog and select Attiva. Then go back to the import flow and select it among the Framework di destinazione.
The import doesn't succeed
Check the status of the operation in the import history and read any error message. Make sure you selected documents, or a source folder containing files, and at least one destination framework.
If Limite di documenti del piano raggiunto ("Plan document limit reached") appears, follow the guidance shown by the platform before adding more files. If the issue persists, share the error message and the stage where the import stopped with support.
I can't start the Gap Analysis
If the platform reports that no document has been mapped for the framework, select Vai all'onboarding ("Go to onboarding"). Import the documents, choosing that framework as the destination, and wait for processing to complete. Then go back to the framework's page and select Run Gap Analysis.
The document analysis isn't available
If the document hasn't been analyzed yet, open it and select Avvia nuova analisi. If the analysis is still running, wait and refresh the page.
If the platform shows a blocker, follow the message shown:
- Nessun contenuto ("No content") — the document has no content or source file to analyze. Check the imported document and whether the original file is available.
- Limite piano ("Plan limit") — the analysis is limited by your plan's conditions. Follow the platform's guidance to free up space or upgrade your plan.
- Connessione scaduta ("Connection expired") — if you use a connected repository, restore the connection from the profile page and try again.